Request Time Off
Requesting time off is done through your timekeeping Employee Portal. This article explains how to request time off, manage conditionally approved requests, and shows you how to set up email notifications letting you know when a supervisor has approved or denied your request.
For a video version of these instructions, see VIDEO: Time Off Requests.
Time Off Topics
Make a Request
A request for time off can be done with the following steps:
- Access the Employee Portal with your timekeeping login and password. Your employer should provide you with both your credentials and the web address for accessing the Employee Portal. After entering the credentials, click Employee Portal.

- Choose the Time Off tab at the top of the page.
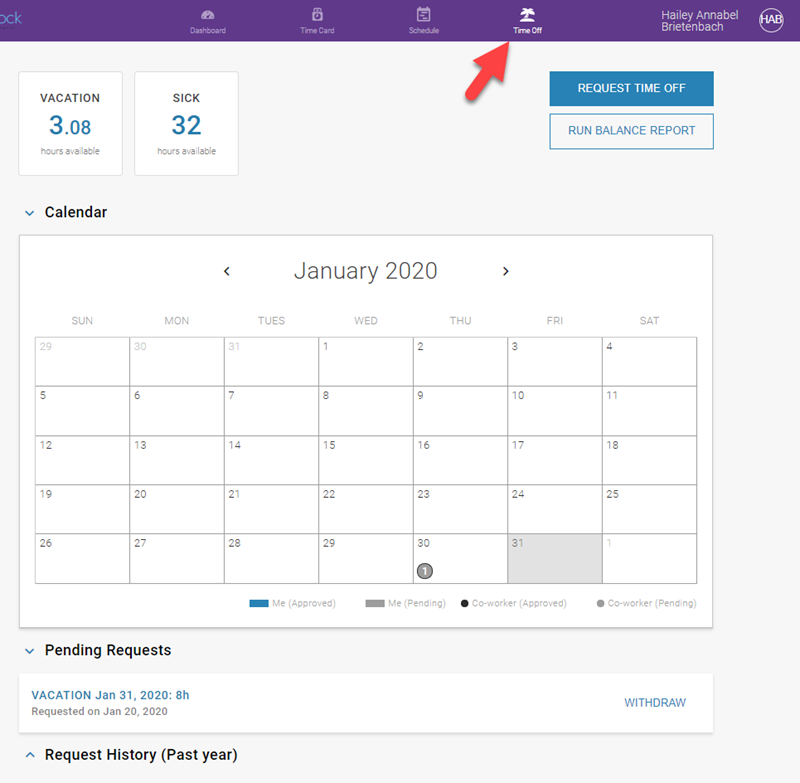
You'll see your available balance and a departmental time off calendar. If you do not see your available balance, check with your employer. Your PTO balance may be tracked in a different system.
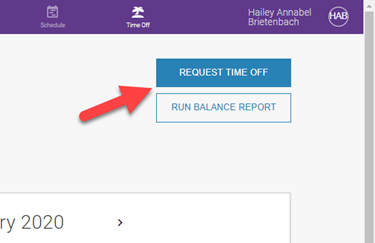
For more on how to check your available time off balance, see Check Your Time Off Balance. - Click Request Time Off.
- Click in the Select Dates field and use the calendar to choose the day or days of your request.
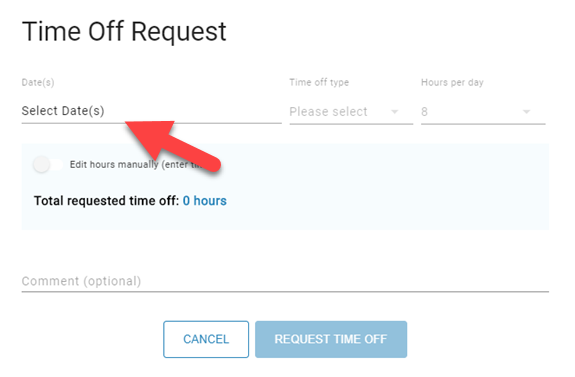
For multiple days, first select the start and then end date of your request. If your request spans one or more weekends, see Include Weekends.

- Click Done once you've chosen your dates(s).
- Use the Time Off Type dropdown to choose the category for your request. The categories displayed will vary based on your employer's categories of paid leave.
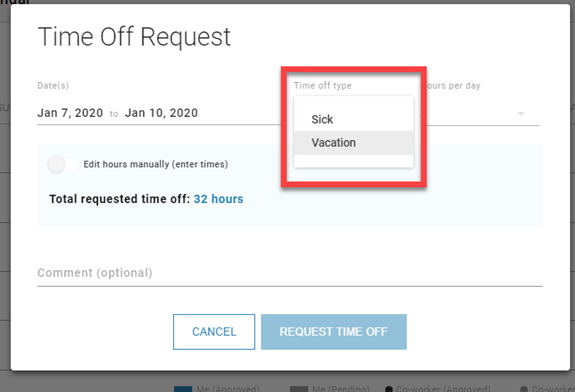
IMPORTANT: The Time Off Type field is required. - In the Hours per day field, select the number of hours used for each day of your request. The amount will default to 8, but you can change it with the dropdown.
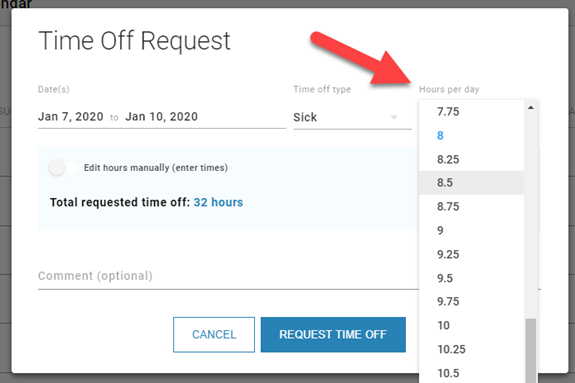
You'll have the option to request time in 15-minute increments, but you should check with your supervisor if there is a company policy on what increments can be used for a request. You should also check on any daily minimum or maximum hours per day.
If you need to adjust the hours for each day individually, please see Edit Hours Manually later on in this article. - Click Request Time Off and an email will be sent to your supervisor notifying them you have a pending request. The date(s) of your request will also appear on your time off calendar as a grey cell.
Time Off Calendar
The calendar on the Time Off tab displays the following:
- Your pending requests as a grey date on the calendar.
- Your approved requests as a dark blue date on the calendar.
- The count of pending requests in your department as a number within a grey circle*.
- The count of approved requests in your department as a number within a black circle*.
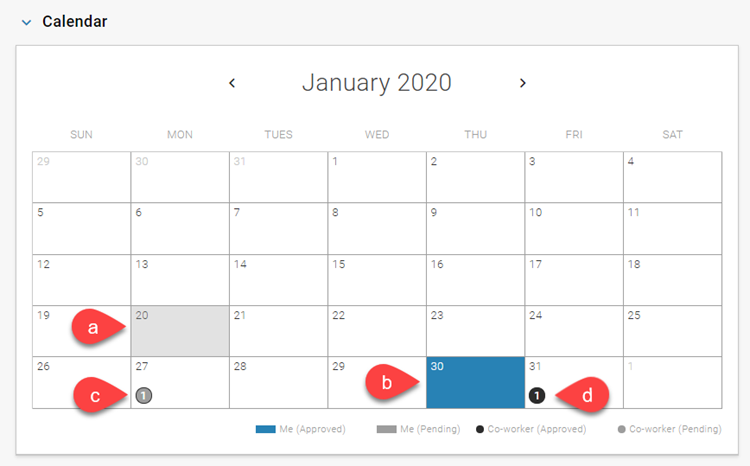
*The departmental time off feature is optional and may not be enabled for your employer's account.
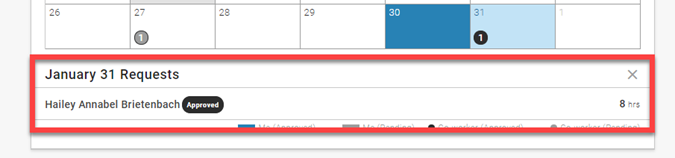
If you click on the numbers indicating your department's requests, you will also see which employees have requested time for that day.
Also, when making a time off request, if your selected dates coincide with any approved requests within your department, Others with Approved Time Off will be displayed below your request details.

That notice can be expanded to show which employees have approved time off for those dates. At that point, you can choose to proceed with your request or change it.
Including Weekends
If your request spans a weekend, Saturday and Sunday will default to "0" regardless of how many hours you enter in the Hours per day field. If you need to use time off on either of those days, disable the toggle labeled Set Weekend Hours to Zero.
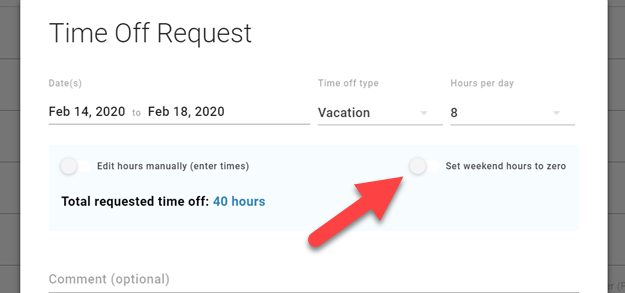
When the toggle is set as pictured above, (switched to the left and white) the Hours per day value will also be applied to Saturday and Sunday.
Edit Hours Manually
Edit Hours Manually is used to specify the time of day you want off as well as altering the amount of hours used on days within a multi-day request.
- Use the Edit Hours Manually toggle to show each day of your request.
- Under each day, you can choose to either a) enter the amount of hours you wish to use for that particular day or b) use the dropdown to select specific times for your request. Once you have chosen your times, click outside the popup to register the change.
- Continue the process for any additional days and click Request Time Off when you are finished.

By manually editing hours, you can
enter time off in "hours" or "times"
Conditionally Approved Requests
If you submit a request and your supervisor conditionally approves the request, it means they have made a change and you need to accept their changes before the request is officially approved.

An example of a conditionally approved request
If you have setup email notifications, you will be notified when a request is conditionally approved. Once you take action through the Employee Portal, the request will be added to your time card.
Withdraw a Request
When a request is Pending or Approved, you still have the option to cancel the request using the Withdraw option.

You have the option to Withdraw any future requests
This purges the request from the time card, and it will show as cancelled in your Request History. A notification is also sent to your manager.

Withdrawn requests will show in your history
Email Notifications for Time Off Requests
In order to receive an email when action is taken on your request, to the Personal Information tab of the Employee Portal and make sure you have:
- An email address
- Enabled notifications in your profile

The Personal Information page in the Employee Portal